Help File
Aussie Renters help file
The left pane offers all states and territories along with the Aussie Renters folder offering the numerous letters and reports and file notes. When you select your state, Legislation with explanation will be offered with readin material and links to the legislation or government and non government oranisations.
Under your state will be two folders, Help file and Packs or if you scroll to the bottom of the Legislation with explanation page, the folders are available also.
Converting your files to PDF
The easiest way to store a document from the Internet is to print it to a PDF. For this reason, we have included this information. The documents can be emailed, as they are however it is best to convert your documents to PDF prior to emailing.
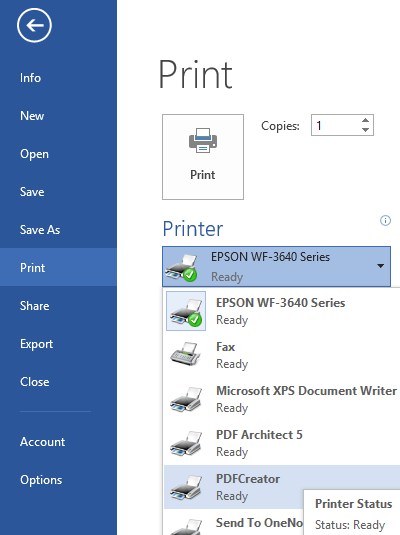
CutePDF or PDFCreator offer free versions of commercial PDF converting software for Microsoft computers that do not have a facility for saving (or rather printing) the file as a PDF. DocHub is another very easy to use PDF converter with the ability to embed your signature and you can send the document directly from this program too. You can sign your letter and send it with DocHub.
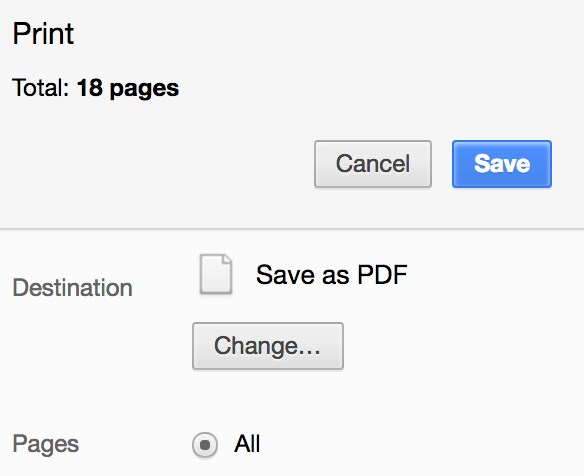
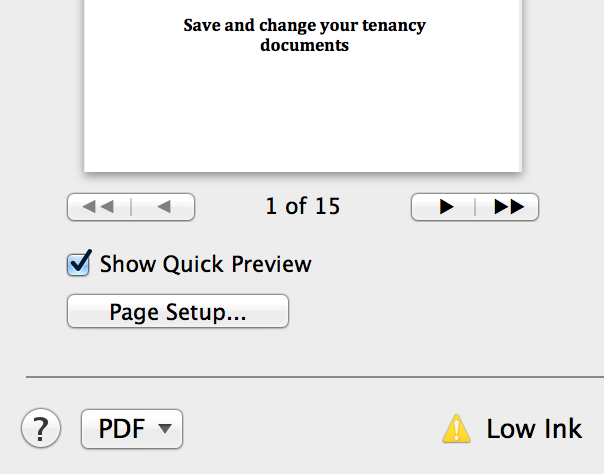
If you are using a Mac computer, the print facility has the option to print the document to a PDF. Select the printing from the menu bar and once the print view is available, select Save as a PDF.
Documents and format
The documents emailed will be:
- Letter with reference list - format YYYY-MM-DD – TYPE – FILENAME – LET
- File note, reference list and register strip – format YYYY-MM-DD – TYPE – FILENAME – FN
TYPE = Main subject - RTA, QCAT, REA (REA = Real Estate Agent or LLD = Landlord)
The documents generated with a letter are:
- Letter - relevant letter addressed to the landlord with paragraphs or sentences included reflecting your responses. The landlord’s email address will appear under the postal address for you to click on and send the letter. Inspection letters (entry, periodic and exit) have an additional page for you to note issues (repairs or maintenance) that require fixing or remedying with a place to drag and drop your image. Termination notice is supplied with the Intention to vacate letter and offers your suitable times for a final inspection. Sign the document and send it with the letter and reference list!
- Reference list - refers to the different sections of the legislation as well as teaching you your rights. A smaller version is listed with the file note, so you know exactly what the legislation says if the landlord is saying otherwise.
- File note - is the cover page for your hard documents and you should store the remaining correspondence under the file note. By writing the reference number in the top right hand corner, you can file the documents in order noting its number on the file note register.
- Reference list (for your records) - if the landlord wants to clarify anything that has been sent. The previous reference list mentioned above will be sent to the landlord with the other correspondence.
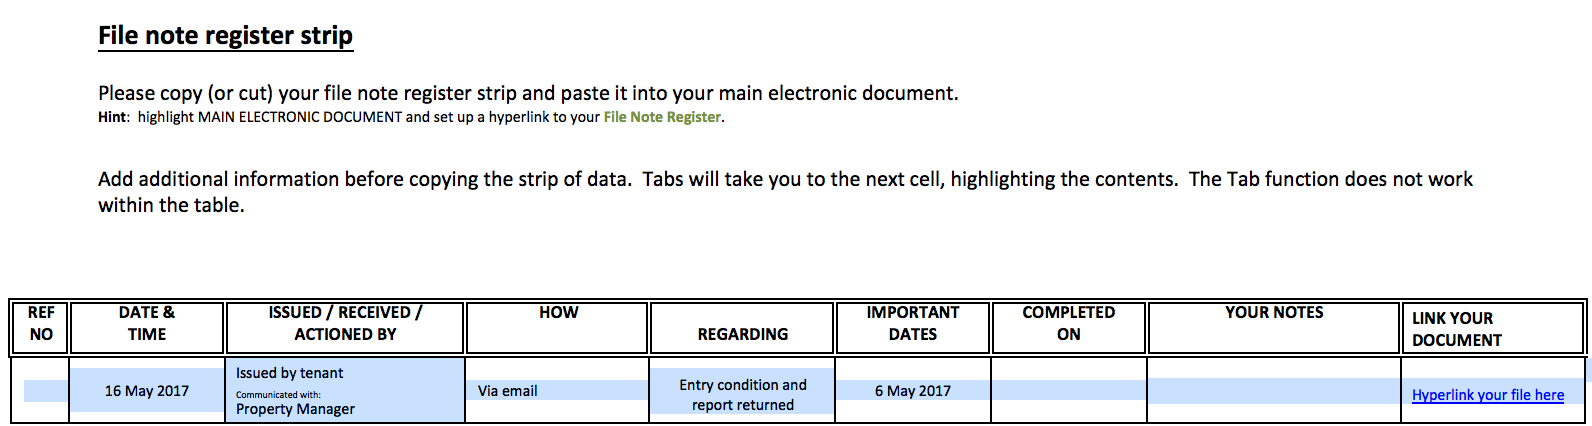
- File note register strip - copy this entry (register strip) and paste it into your file note register.
File note generator offered by Aussie Renters
First time users: make sure you are a member and have downloaded Aussie Renters TERMS, setting it up prior to running your first letter or file note. Have a read of our Tenancy Electronic Record Management System section below before returning to this screen. Please note: our website is mobile responsive, however instructions are not written for using our TERMS on a mobile device. If you tech savvy, set up folders on your mobile phone or save the emails in it’s own folder in your emails, as this will help keep your documents organised.
To help with managing your tenancy affairs, we have incorporated a file note, and you can generate one from our website. Every letter generated will arrive with a file note. Create one every time you interact with the rental property or have manual copies available to write on. Example: the smoke detector has been checked by a qualified trades person.
Generate a file note:
We are using file notes to tidy up your filing system by supplying a header type page and a place to write manual note. The file notes can be generated from our website, manual copy printed and written on or the file note will be attached to our email we send to you with your letter.
- Please make sure you are logged in before generating a file note.
- Click this link or select Aussie Renters (to the left) then select file note – OR – mobile devices under Where are you renting?

Scroll the screen and select the File Note and click 
Complete every field and click 
Please note:  is disabled due to the file note being a free product. If you are not logged in, add to cart will appear instead of the responses required.
Email arrives from Aussie Renters
When your document is ready, the file note and register strip will be emailed to you. Download and save the document to the Corro folder under Aussie Renters TERMS. Follow the remaining steps to save, print and file, the file note:
- Generate – select file note from our website.
- Email received – We will endeavour to send your file note within a 24 hour period.
- Save – before changing or printing the file note, save it in the relevant Aussie Renters TERMS folder.
- Open – the file note register and the saved the file note. This will ensure the correct document is used.
- Record issues – change the file note, if necessary.
- Print and save – when you have made your changes, print the document and then save and replace. Do not save it as an extra copy as this will cause confusion in the future.
- Copy (Control+C or Command+C) – locate the register strip on the last page. Block highlight the row that contains the data and copy this data.
- Close – the file note and present the file note register document.
- Paste (Control+V or Command+V) – Block highlight the empty row in the file note register and paste the row of data.
- Link and allocate – Hyperlink your file note to your master file note register (see Linking your document to the register). Allocate a new reference number.
- Save – and close your file note register.
- File – Write the reference number on your file note and file the hard copy in numeric order.
- Finalise – Staple the copies together and record the days to resolve (see Finalise a file note).
- Reminder – put a reminder in/on your calendar to alert you to follow up on issues, if they haven’t been remedied

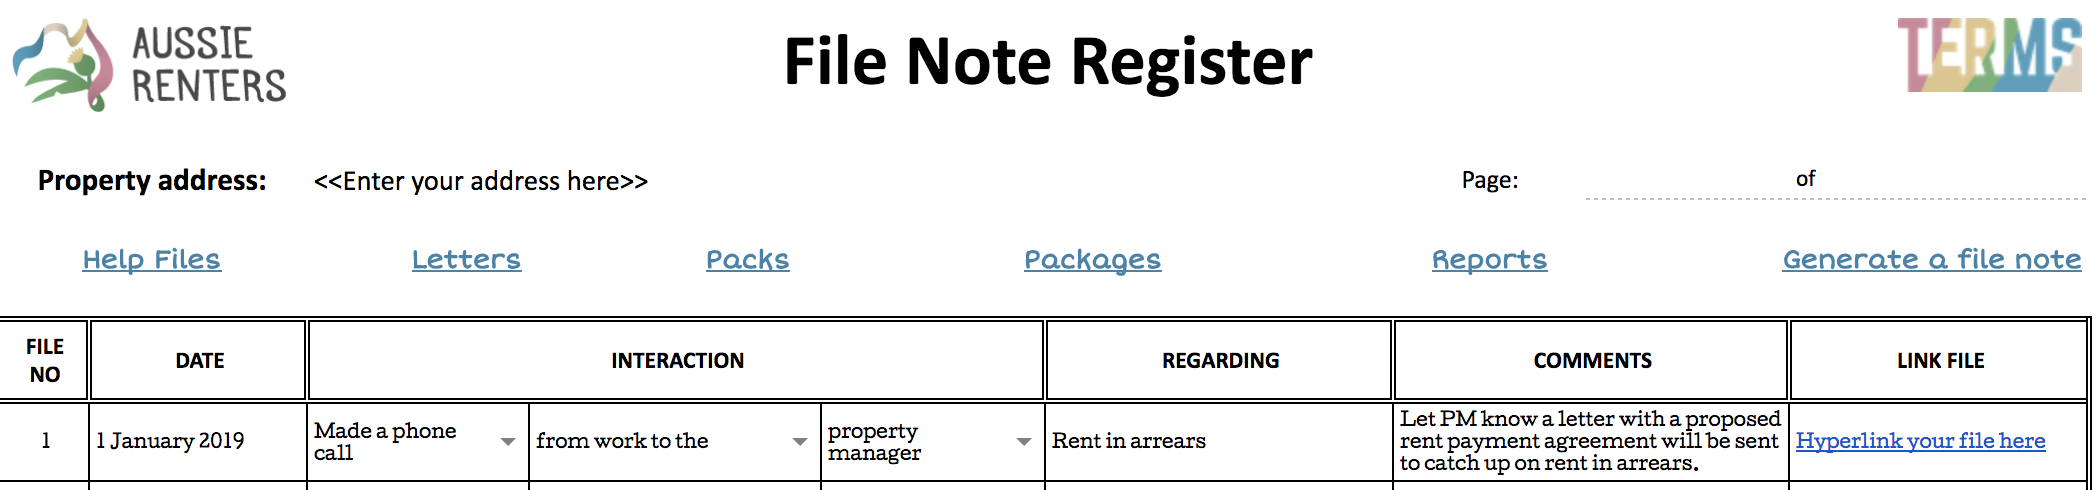
File note register
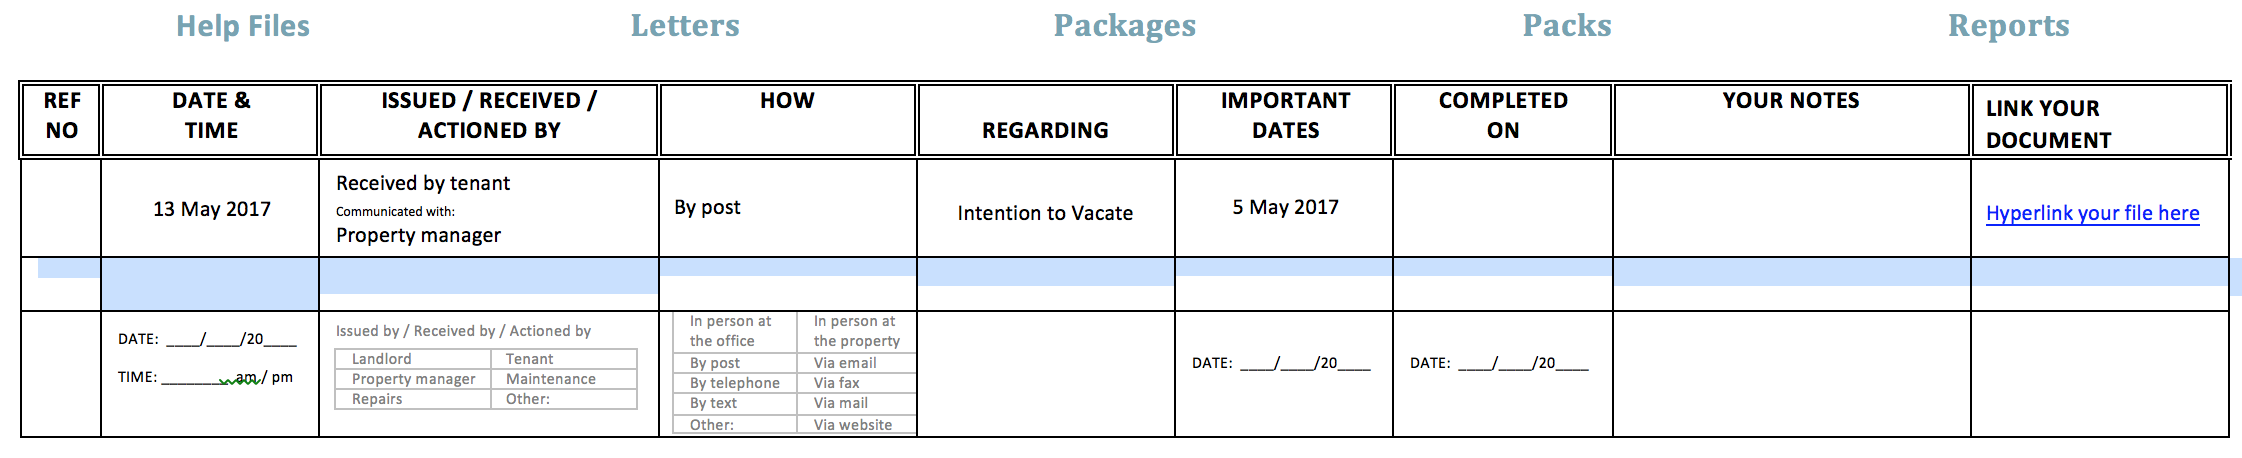
There are two styles of the File Note Register and both can be located in the Aussie Renters folder or can be downloaded from the Help Files (see below). The register is your bible to your tenancy history so try to keep it neat and tidy, making sure any notes or additional comments are written on the head file note.
Our letters include a ‘register strip’ containing your data (used to compile the letter and file note) and it is located at the very end of the main document.
Due to people preferring to make written notes, we have included a printable version for you to use.
- Manual copy has been prepopulated to allow quick responses i.e. circle or highlight the applicable response.
- Electronic copy is presented in MS Word to allow electronic entries. Create a shortcut on your desktop to access this document.
The benefits of using the electronic copy is, the links will re-direct you to our website where you can generate a file note or letters. Also on the register are the choice of two register strips that can be used separately or in conjunction with your master register:
- Copy and paste the Aussie Renters generated register strip into the blank row; or
- Copy and paste the manual register strip into the blank row and use the ‘text highlight’
 to mark your responses, as shown on the illustration below.
The second process is helpful if you wish to write a manual file note and then note it on your electronic master register.
Example: you have scanned your tenancy agreement and want to attach it to the master register:
- Copy the manual register strip.
- Paste it in the blank row.
- Complete the register strip by entering a reference number the text highlighting - e.g. Received by Tenant; Property Manager; in person at the office.
- Under important dates, you could enter the renew agreement date or perhaps the end of agreement date.
Write the allocated reference number in the box. Use this file note as the cover, header page for the documents. Staple or clip them together and file them in a folder, suspension file or A4 box.
| Electronic DOCX |
Electronic DOC |
Manual PDF |
The manual copy is for all the Aussie Renters that like to write notes in preference to typing them. The manual copy has prepopulated responses which allow you to record faster by circling or highlight a response. You can always generate a new file note with the updated information.
Finalise a file note
When the issue or repair has been remedied, or the file note is no longer active, it can be finalised. At this point, work out how many days it took to fix the problem.
- Mark – date completed on your master file note register.
- Highlight – mark the date so it stands out as completed.
- Mark – put a line through the hard copy file note number so you can visually see it is finalised.
- Calculate – the amount of days it took to remedy the situation and place the number in the blue box under the words “Days to resolve”.
- File – staple the hard copy together and file numerically.
If you do this from the beginning of your tenancy, you will slowly recognise the how long the issues takes to resolve. If your landlord is continually dragging their feet to have things repaired, then you might handle the next issue by being more assertive and applying the squeaky wheel approach!
For instance, the records show it took 60 days to fix a dripping tap and now you want your water bill compensated, as you did not use this water, it dripped due to the landlord not fixing it. Recording how many times you attempted to have this issue resolved will only help your argument. If you are in this situation, place a jug under the dripping tape and remove it exactly one hour after placing it there. Measure the amount then calculate it by 24 and then by 60. 500 ml per hour will equal 720 ltr, nearly a kilolitre. It may not seem much but why should you pay for it? This example is minimal whereas reporting a green patch in your garden to your landlord might cost a few more dollars, if you were away for the weekend and it sprung into a giant water feature.
Help file
Please feel free to download a copy of our Help File by clicking our logo or locate a copy under the Aussie Renters folder. A complete copy has also been included in the Take Action Tenancy Pack.
![]()
Images and pictures
Storing the pictures taken at the entry or exit inspection is crucial to securing your bond money. If you do not keep these pictures safe, at the end you may struggle to prove the property was in the same condition when you moved in.
Import all the pictures and rename the main ones to the number listed on your condition report (or Post-It notes system – see our Booklet for Tenancy for an explanation). Ensure the pictures are stored in the Aussie Renters folder under their relevant room.
Our entry or exit condition letter has a table included and you can list the issues or discrepancies with the property by dragging and dropping the picture taken showing its condition or damage.
- Import - pictures to your computer.
- Examine - pictures and move them to their relevant room.
- Rename - main pictures using format YYYY-MM-DD – PIC001.
- Open - saved entry or exit letter from relevant folder and locate the table on the third page.
- Complete - table with issues or discrepancies in the column provided.
- Locate - one picture for each issue showing the damage or issue. Drag and drop into the column provided.
Letters you wish to produce
First time users: make sure you are a member and have downloaded Aussie Renters TERMS, setting it up prior to running your first letter. Have a read of our Tenancy Electronic Record Management System section below before returning to this screen. Please note: our website is mobile responsive, however instructions are not written for using our TERMS on a mobile device. If you tech savvy, set up folders on your mobile phone or save the emails in it’s own folder in your emails, as this will help keep your documents organised.
In Legislation with Explanation you will see our logo at end of the section you are reading. Click on the logo and you will be redirected to our letters.
Generate a letter:
- Ensure you are logged in before generating a letter.
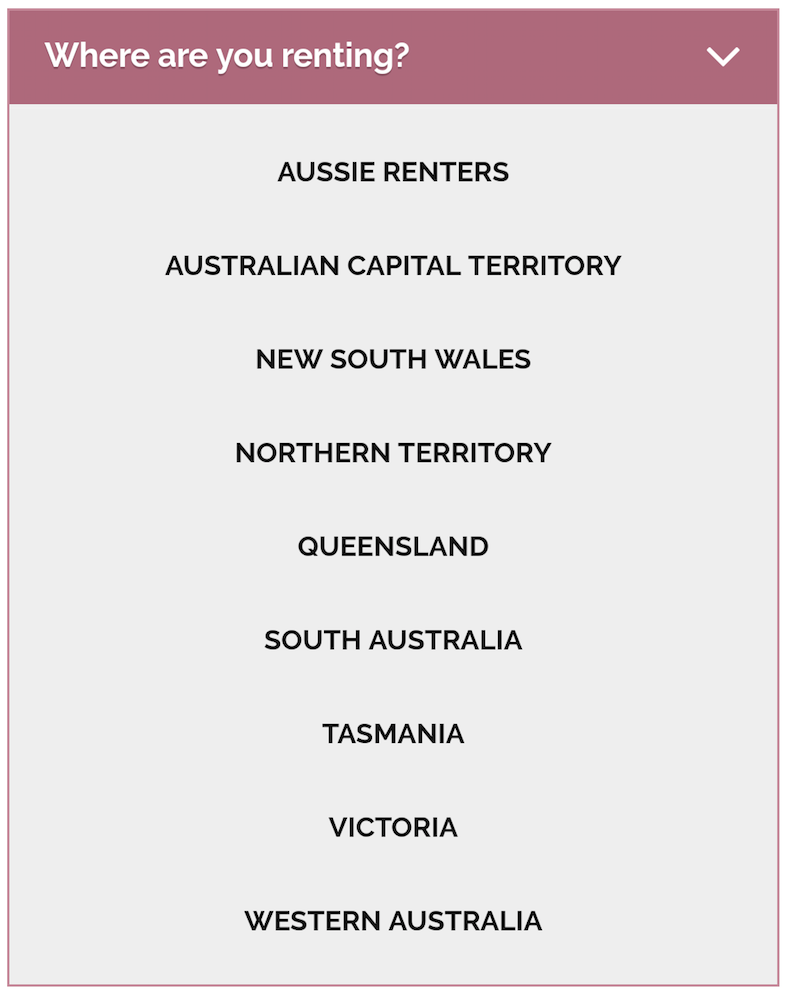
- Click this link or select Aussie Renters (to the left) then select letters – OR – mobile devices under Where are you renting?
Scroll the screen and select the letter you wish to generate and click
Complete every field and click
Please note: is disabled due to the letters being a free product. If you are not logged in, add to cart will appear instead of the responses required.
Email arrives from Aussie Renters
When your letter has been compiled, two documents consisting of your letter, file note and register strip, will be emailed. Download and save the both documents to the Corro folder under Aussie Renters TERMS. Follow the remaining steps to save, print and file, the letter:
- Generate – select the letter from our website.
- Email received – We will endeavour to send your letter and file note within a 24 hour period.
- Save – before changing or printing, save it in the relevant Aussie Renters TERMS folder.
- Open – the file note register and the saved the letter and file note. This will ensure the correct document is used.
- Record issues – change the letter and file note, if necessary.
- Insert – signature block above your name *
- Print and save – when you have made your changes, print the document and then save and replace the document. Print two copies if posting and one copy if emailing. Do not save the document as an extra copy as this will cause confusion in the future.
- Posting - two signed copy – post the letter to the landlord and write FILE across the top of the second copy, placing it with the other hard copies.
- Emailing - one signed copy – email the letter and reference list and write FILE across the top of the printed copy, placing it with the other hard copies.
- Copy (Control+C or Command+C) – locate the register strip on the last page of the file note. Block highlight the row that contains the data and copy this data.
- Close – the letter and file note and present the file note register document.
- Paste (Control+V or Command+V) – Block highlight the empty row in the file note register and paste the row of data.
- Link and allocate – Hyperlink your letter to the file note register (see Linking your document to the register). Allocate a new reference number.
- Save – and close your file note register.
- File – Write the reference number on your file note and file the hard copy in numeric order.
- Finalise – Staple the copies together and record the days to resolve (see Finalise a file note).
- Reminder – put a reminder in/on your calendar to alert you to follow up on issues, if they haven’t been remedied
* If you wish to sign the document then:
- Print and sign – the letter.
- Scan – signed document.
- Save – scanned copy and replace the letter (LET filename).
If you require additional assistance, please use our administrative skills to tailor make your letter by return email, requesting our help. Our packages start from $15 for 15 minutes for our clerical assistance.
If you believe a letter you have created could be helpful to other Aussie Renters, please contact us and we will replicate it, releasing the letter for everyone to use.
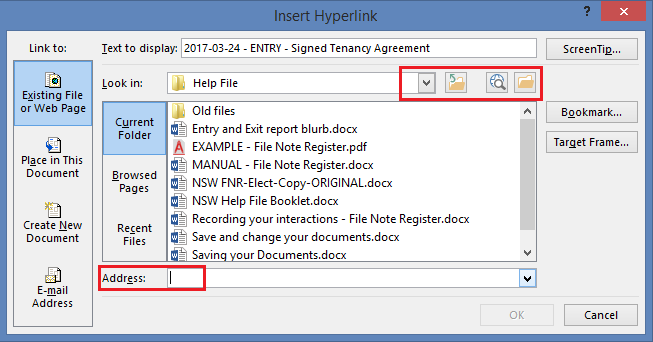
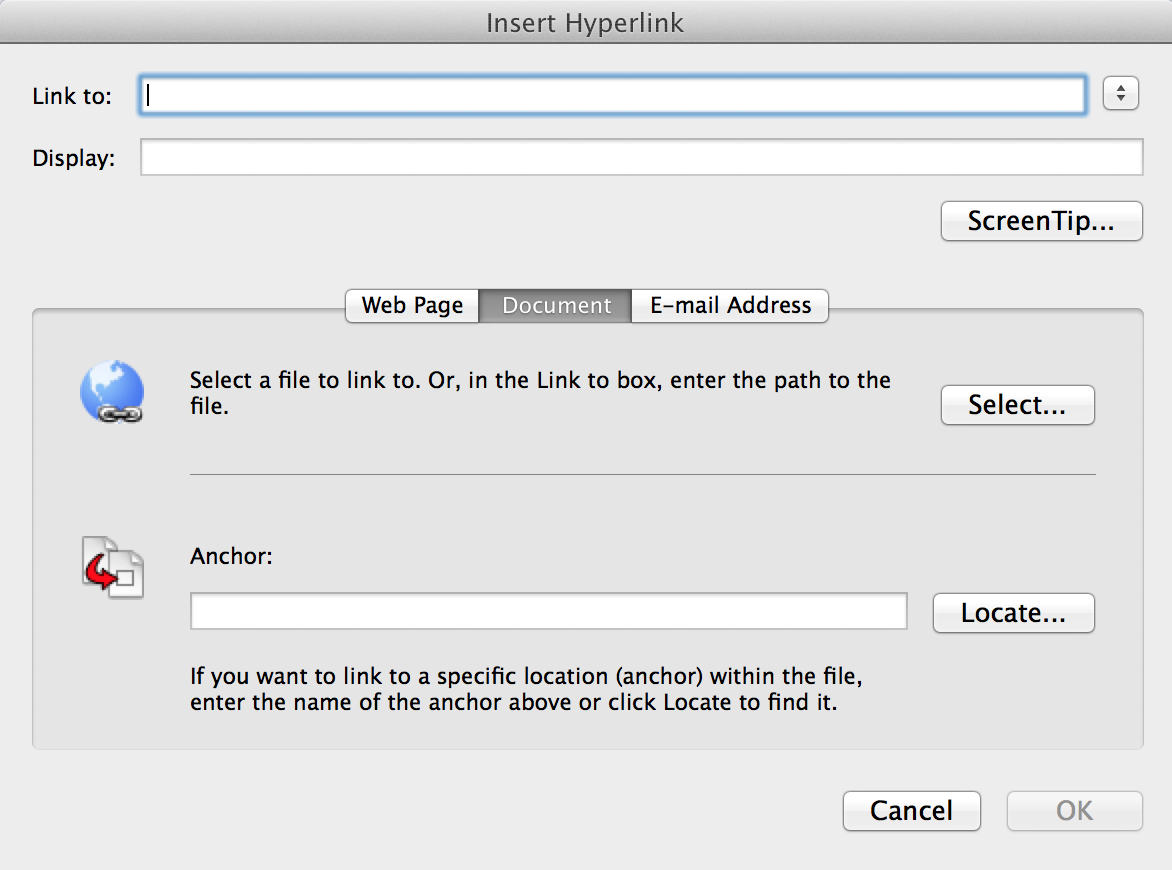
Linking your documents to the register
This is possibly one of the least used facilities in MS Word. Instead of locating the hard copy when you want to check something, simply click the link and your document will appear.
- Open – file note register.
- Click – place your cursor anywhere in the row and tab to the far right hand column, highlighting Hyperlink your file here.
- Right click – on the highlighted display name and select Hyperlink or select from the menu Insert > Hyperlink.
- Select Document – as the hyperlink you are saving.
- Select Locate or Browse.
- Navigate – find your document and click OK or Open.
- Link to - your document link has been inserted and the next step is to name it.
- Tab - over to the next field and enter a name for the linked file (type over Hyperlink your file here).
- If it looks like the image below, click OK.
When you name the document in the linking process (step 7), name the document something simple, like letter or scan. The format used when saving a scanned document or a picture is to allow you to read what the document is by reading the name of the file. For the purpose of the register, you can just use a simple word so you know it is the letter attached rather than some notes you may have taken and scanned.
If you have printed the manual file note register, use this column for additional notes as the doc ref no will point you to the hard copy file or correspondence rather than clicking a link.
Name your document using our format
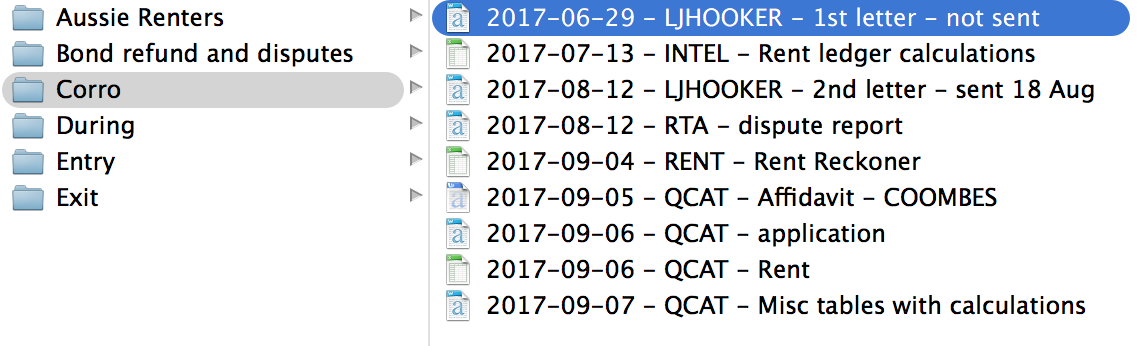
Scan or take a picture of every document you receive or generate (give or send) and save it to Aussie Renters TERMS folders. Using our format, you can read the file and know the contents at a glance.
Using the example below, due to a dispute involving rent not being credited, the matter went to RTA however was unresolved. An application is being processed for QCAT to request for an order to be made, resolving this dispute. If this was a bond refund dispute, these documents would be stored in the Bond refund and disputes folder.
TYPE = Main subject - RTA, QCAT, REA (REA = Real Estate Agent or LLD = Landlord)
To change the filename:
- Click on the filename and right click selecting rename. You can double click to make the filename editable however if you are too quick, you will open the document.
- Rename the filename using our format, leave the extension in place, example: doc, pdf, jpg, png, bmp etc.
See our complete Help File booklet for additional assistance with renaming your document.
Rename a document using our format
When renaming a document, always leave the extension in place. Example: doc, pdf, jpg, png, bmp etc. The extensions are pretty important when it comes to making the file work!
The reason behind renaming your documents and pictures is so you can identify the contents by the filename. Example: The kitchen oven is not working and an urgent repair has been requested. The format 2017-05-06 - REA - Oven repair request.pfd means you sent a letter requesting the repair to the real estate agent.
Microsoft Window
- Highlight the file.
- Right click and select Rename.
- Type the new name using our format.
IF renaming many, highlight the text and copy (Ctrl+C).
- Otherwise, click enter and the file will be renamed.
ALTERNATIVELY
- Double click on the filename and the name becomes editable.
- Click enter and the file will be renamed.
Apple Mac
- Slow double click on the file (click once then click again but not as fast as a double click).
- Rename your filename.
- Click enter.
ALTERNATIVELY
- Highlight the file.
- Click Perform Task.
- Select Get Info.
- Open Name & Extensions.
- Rename and close the window.
Saving your document
Saving everything electronically is a simple process due to the amount of technology we have at our fingertips. By starting this process at the beginning of your tenancy, it will ensure a neat and tidy correspondence system.
Every document should be scanned and saved electronically. Initially, this may be difficult however once you have settled into your new home, an hour of your time will tidy up your documents and pictures.
Our letters will be emailed to you and there will be two attachments:
- Letter with reference list (format YYYY-MM-DD – TYPE – FILENAME – LET)
- File note with register strip (format YYYY-MM-DD – TYPE – FILENAME – FN)
TYPE = Main subject - RTA, QCAT, REA (REA = Real Estate Agent or LLD = Landlord)
By using these formats, you can sort the documents into ascending or descending order and linking your documents to the File Note Register will be much easier. If you require assistance from us, due to using this format, it will make it easier for Aussie Renters to request particular documents (we may want to examine a document to see how we can help). The main pictures that you are referring to in any correspondence should be renumbered too. We suggest something simple like 2017-09-01 - PIC001 etc.
Set up your main folders
The Aussie Renters TERMS should be saved on either the desktop or your documents folder, on a computer. If you are really tech savvy, you can set up your mobile phone to store your documents electronically however we do not include instructions for this. It is a simple process and should only take a minute to set up.
Please follow instructions listed under the Aussie Tenancy Electronic Record Management System (TERMS).
Aussie Renters folder – contains the file note register and other freely available products available at Aussie Renters. We have included the current forms for you state or territory, so please ensure you download a new copy every time you move. This will guarantee you are getting the latest forms available. The links for the different forms are also available, if you want to download it rather than searching your folders for the document. The letters are processed via our website along with the file notes.
- Electronic file note register – locate the electronic version and create shortcut on the desktop or cut and paste it onto your desktop for easy access.
- Manual file note register – locate the manual copy and print a copy or two for the start of your filing system. Place these in a plastic sleeve or clip them in to a folder or on a board, make it separate from the correspondence you are going to store.
Corro folder – save all correspondence received or sent to the landlord, basically anything regarding the property.
Entry and exit folders – store your entry or exit correspondence under these folders as well as the pictures you have taken. If you do not need 6 bedrooms and 3 bathrooms, trash the extra folders.
During folder – separated into inspection in the year. Save any entry notices in these folders and any additional requests made during the inspection. Folders have been provided for the pictures.
We recommend recording ALL documents, saving them in the applicable folders using our format to allow you to read what the document is at a glance.
Setting up your signature block
Printing, signing and scanning are all eliminated from the process of emailing a letter if you put your signature into the document electronically. Once you have made your signature image, it is a matter of inserting it into the document. Save your signature under the Aussie Renters folder and you can use it in any electronic document.
- Sign a blank piece of paper as close to the top as well as the left hand side without running off the page.
- Scan the signature.
- Save the document as an image (jpg, bmp, png).
Microsoft Paint
- Right click and open the image with MS Paint.
- Crop close to the signature.
- Cut (Control+X) the image.
- Select New > Don’t Save.
- Paste (Control+V) the cropped signature.
- Adjust the white area around the signature. Make it as close as possible without removing any of the signature.
- Save the signature under Aussie Renters folder calling it Signature
Apple Mac
- Double click to open the signature image.
- Take screenshot (Command+Shift+4).
- Locate the image (usually in Desktop).
- Rename to Signature.
- Move the file to the Aussie Renters folder.
This signature block can now be used in the letters (or other documents) by inserting it into the space above your name.
- Open the letter you wish to place your signature into.
- Place your cursor on the row above your name.
- Select Insert > Photo > Picture from file.
- Navigate to the Aussie Renters folder.
- Double click on the signature file - or - Click on the file and select OK or Open.
- Adjust the signature by clicking on the image then use the corner/diagonal arrows, drag the image to a suitable size, one that looks real.
- Save the document.
Tables within a word doc
Any tables used in our documents have the cells set to a permanent size and cannot be adjusted due to the pictures being dragged and dropped into a cell. Generally the cell will adjust to accommodate the picture however we do not want this occurring as the pictures would require cropping to make them fit.
The size has been set to prevent the table going haywire and shrinking or adjusting in ways that you cannot imagine. By setting the cell size permanently, it will adjust your picture to fit its size. Problem solved!
Add rows to the table:
- Click in the bottom row, right side last cell.
- Click the tab button and a new row will appear.
ALTERNATIVELY
- Place cursor in the row where you want the additional row.
- Select Table > Insert > Insert row (above or below).
Copying and pasting a row:
- Highlight the entire row by running your mouse down the left hand side of the table until a different cursor arrow appears then click the mouse and this will highlight the entire row.
- Copy (Control+C or Command+C).
- Paste (Control+V or Command+V).
If you paste immediately, the identical contents will duplicated and you can change either row to suit your needs.
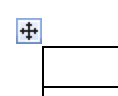
Copying the table:
- To highlight the entire table, drag your mouse over the top left hand corner until the icon below appears. Click on the cross
 .
. - ALTERNATIVELY drag your mouse over the top of the table, left hand side and when the down arrow appears, click the mouse and drag to the right highlighting the whole table.
- Copy (Control+C or Command+C).
- Open the document that contains the table you wish to replace OR you want to place the copied table.
- Place your cursor where you would like the table to be.
- ALTERNATIVELY highlight the table being replaced by completing step 2.
- Paste (Control+V or Command+V).

Remember if you add any section of the Legislation, you will have to type it on the reference list as we have done. The reference list is in another table, so the actions you took (copying and pasting) will have to be repeated in the same document. If you get stuck, contact us for help fixing the documents via email.
Tenancy Electronic Record Management System (TERMS)
Our TERMS has been designed specifically for the tenant and by using our system to manage your interactions with the rental property, you will be more organised as well as knowing more of your rights.
The first step to setting up a reliable tenancy management system is to keep a journal, a register of sorts. Attach the documents to this register and it creates the easiest system to manage your documents and correspondence while creating your own tenancy history.
To get started using our TERMS electronically, please:
- Click on and download the zip file located in Packs
- Save the zip file to your Desktop or MyDocs
- Double click the zip file and the folders will be saved to this location
- Open the Aussie Renters folder and locate the file note register (register) electronic version
- Make a shortcut to the register placing it on your desktop. If you prefer, cut and paste the register to your desktop
- Scan all documents relating to the property, placing the scans into the applicable folders
- Rename each file/document using our format listed on the next page (you can read each filename at a glance this way)
- Link the relevant documents to your register.
- Create a file note for each different issue or activity i.e. moving in or tap washer needs replacing. These can be done manually by printing copies of the manual file note saved in the Aussie Renters folder
- Create a new reference number for each issue or activity and type it on the register
- Write the number in the box at the top right hand corner of the file note
- Calculate the days it took to repair or fix a previous request before finalising the file note
Continue this process with all your documents until you have them neatly filed with the file note placed on the top of the bundle as your header page. Make any notes on the file note to remind yourself of anything important
To get started using our TERMS manually, please:
- Click on and download the zip file located in Packs
- Save the zip file to your Desktop or MyDocs
- Double click the zip file and the folders will be saved to this location
- Open the Aussie Renters folder and locate the file note register (register) electronic version
- Print a copy (or two) and file it at the beginning of your filing system, in a plastic sleeve or a couple holes and into a folder
- Follow the process 9 to 13 listed above
Working out how you physically file the documents is up to you however filing them in numeric order with the register, will be the best way to retrieve the hard copies. The file notes can be printed on coloured paper to help with separating each file and an A4 document box will do the job if you hate filing. Make sure you staple or clip the file note to keep the relevant information together or place in a plastic sleeve with the file note on top as the header page.
Aussie Renters can mail you a personalised copy of our Take Action Tenancy Pack in a 13 Pocket Expanding File with tab dividers to store your important documents.
Our help files are built around our system, TERMS. Additional information has been provided to navigate and use features of MS Word so you can change any letter to suit your specific requirements.
A copy of our quick guide to using the Inspection section of our TERMS App as well as the 21 paged guide providing an example of how each Note is recorded.
|
|
Quick guide using TERMS App
|
Full version help using TERMS App
|
There are no products to list in this category.